So, if you are tired of Mailchimp, can’t make it work for you and wondering how the heck to use Mailchimp for email marketing, this article is just for you.
I’m going to show you how to use Mailchimp’s free version to do almost ALL the things that a pro Email Service Provider (ESP) will let you do. Ready?
RECOMMENDED READING:
Mailchimp’s Free Plan
Mailchimp offers a very generous FOREVER FREE plan. This plan is free up to 2000 subscribers and 12000 emails per month.
And until you reach these targets, there’s no need to upgrade to a paid account. This is something that people are looking for when they are earning nothing from their businesses yet.
But, Mailchimp works in a different way than other ESPs (as I already said), so it’s hard to understand how to make it work. Plus, there are not many tutorials about it around the web, hence it makes it even difficult for people to grasp Mailchimp.
That is why I created this tutorial about Mailchimp.
There is only ONE major problem with Mailchimp that causes every other problem, and the problem is that there are not many articles around the web about Mailchimp explaining the RIGHT way to use Mailchimp. And so, people start using it the wrong way and hence get trapped into Mailchimp’s other problems.
If you are someone who has been using Mailchimp and are frustrated with it, want to apply the new ideas emerging in your head but can’t help because you are on Mailchimp?
You know that other ESPs provide those abilities that Mailchimp doesn’t, but you just can’t afford other ESP right now, and are stuck with Mailchimp, then this tutorial is for you.
I’ll take you through ALL the ways you can use the FREE Mailchimp account to accomplish almost everything that another ESP will do for you.
So, sit back and get happy because now all your innovative ideas about email marketing are going to get REAL – without spending a dime!
Here’s what we will cover in this tutorial (Feel free to jump to the section you want to read):
- Mailchimp Vocabulary
- Problems with Mailchimp
- How to create a Mailing list in Mailchimp?
- How do I design signup forms in Mailchimp?
- How do I add a Mailchimp signup form to my website?
- How do I tackle multiple opt-in freebies in Mailchimp?
- Embedding Mailchimp Signup form for multiple opt-ins
- How to get the Mailchimp API key
- Creating Signup Forms for Multiple Opt-in Freebies
- How to tackle “Already Subscribed” problem in Mailchimp Single List Structure
- Embedding the Yikes Easy Forms for Mailchimp into your website
- Creating Another Signup Form in Yikes Plugin in 4 Simple Steps
- How do I create an automated email in Mailchimp for multiple freebies?
- What if I already have multiple lists? How do I merge lists in Mailchimp?
Do you already know all these topics?
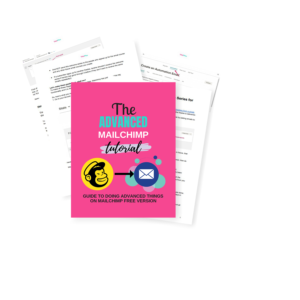
Then, download my Advanced Email Marketing Guide:
The Advanced Email Marketing Guide
This is what you’ll learn:
- How to create a general welcome series for all the small freebies
- How to align general welcome series with an email course freebie
- How to create a regular list to which you can send your “regular” emails (without worrying about clashing with automations and sending 2 emails in a day!)
- …and more!
Mailchimp Vocabulary
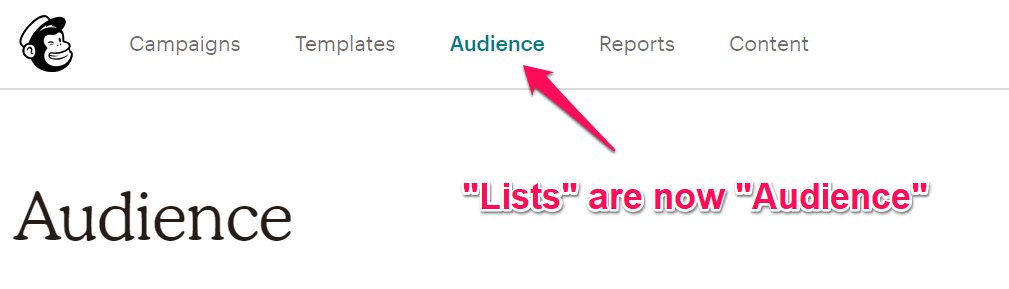
What is a Mailchimp List?
March 2019 Update: Mailchimp “Lists” are now Mailchimp “Audience”. So, wherever I use the word “List” in this tutorial, replace it with the word “Audience”.
Mailchimp list is the list of people’s contacts (like name, email addresses, phone numbers, etc.) that have subscribed to your website. Mailchimp stores all those contacts in “Lists”, now “Audience”.
March 2019 Update: Mailchimp Lists are now “Audience”
What are Mailchimp Campaigns?
A Mailchimp campaign is a marketing message that you share through email or ads. Through these campaigns you can send emails, create landing pages or ads.
RECOMMENDED READING:
Problems with Mailchimp
There are TOO many problems with Mailchimp, and they occur only because of just ONE major problem. This is the problem because of which people avoid using and recommending Mailchimp.
Major Problem:
Lists are individual
There is no coordination between lists in Mailchimp, unlike other ESPs. Other ESPs provide you the facility of moving subscribers from one list to another on automation. But, in Mailchimp, lists are individual, and you can’t move subscribers from one list into another.
This major problem causes many other problems. Here are some of the problems that you might relate to:
Problems due to individual Lists
Multiple opt-in freebies in multiple lists
When you have more than one freebie on your website, it’s difficult to figure out how to send different automated emails for different freebies, and hence, the natural solution seems to be to create another list. Once you have another list, it creates another problem – when you want to send emails to ALL the subscribers, you can’t.
Emails cannot be sent to multiple lists
Sending emails is also list based. You can only choose to send emails to a single list. This means you have to send the same email to all the lists, manually.
This usually doesn’t become a problem, unless a subscriber has opted in for more than one freebie at your website.
Problem?
This subscriber will receive the same email from you multiple times!
This is frustrating and increases the chances of getting unsubscribed.
Multiple opt-in freebies in same list
You might think that having a single list for multiple opt-in freebies will solve all your problems (and it does, if done the right way), but…
When a person who is already a subscriber tries to opt-in for another freebie, Mailchimp form shows “You are already a subscriber. You can update your preferences here”. And then you don’t even have the leisure to change that update email.
But why go there? Why would a subscriber need to go through all those extra steps when he/she SHOULD be able to access the opt-in freebie right there itself? And yes, it’s possible to do so, I’ll explain all that in a step-by-step manner in this tutorial.
Breaks Law
This is a biggie. According to the Spam Act Law, you shouldn’t email those subscribers who have unsubscribed.
Mailchimp’s unsubscribes are list-level too. So, for instance, if a subscriber has opted in for multiple freebies and then chooses to unsubscribe through an email, he/she will only get unsubscribed from that list.
So, if you have multiple lists for multiple opt-in freebies, the person is still your subscriber in another list, and hence, you will never know that you are still emailing the person who unsubscribed from your list. This breaks the Spam Act law.
Higher bills
Mailchimp charges according to the total number of email addresses. So, if you have the same email address in multiple lists, you will be charged multiple times for the same email address. (Though this shouldn’t concern you until you are on the free plan, but don’t make it let you reach the paid plan sooner!)
Integrations connect to single list only
Mailchimp provides a number of integrations with other services. But, most of these integrations, like Shopify, or SendOwl, connect only to a single list.
All these problems occur because Mailchimp lists are individual. And because of that, you need to have only ONE list in Mailchimp.
RECOMMENDED READING:
How do I create a mailing list in Mailchimp?
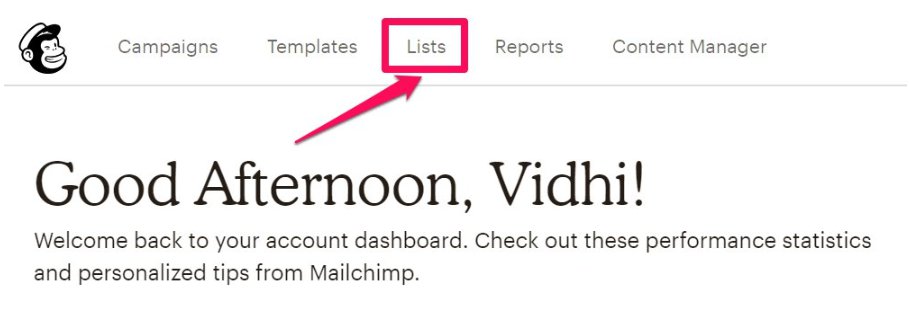
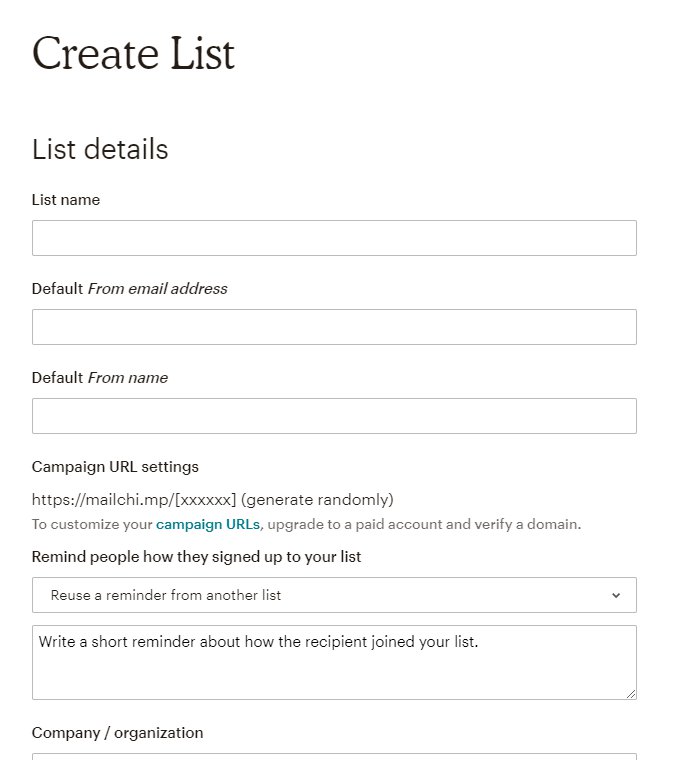
1. Log in to your Mailchimp account and go to lists.
2. Click on “Create List” on the right hand corner.

3. Fill all the details in the next page.
Note: Name the list something good, because it will be visible to your subscribers when they go to update their preferences.
Once the list is created, you need to embed your signup form inside your website to collect subscribers. Yep, it’s that easy.
How do I design signup forms in Mailchimp?
1. Click on the list you want to create signup form for and then click on the “signup forms” from the menu bar.

2. Now click on “Select” beside the form builder:

3. Here you can choose the information you want to collect from your subscribers.
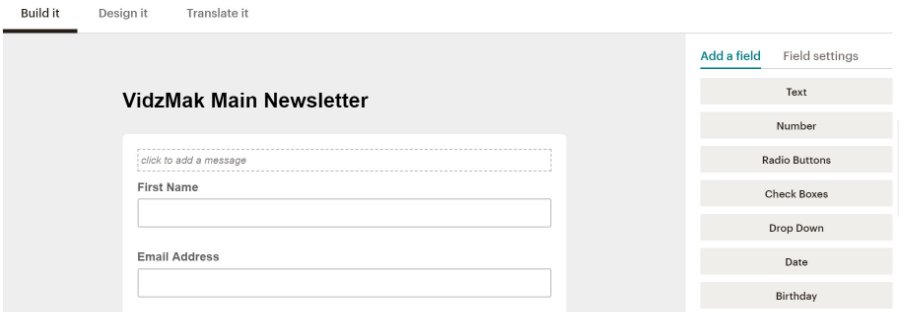
Build your form as you like. You can add fields, drag the fields up and down or remove them. It’s up to you how you want your form to look like.
4. Once done, click on the “Signup forms” again in the menu bar, to add your Mailchimp signup form to your website.
RECOMMENDED READING:
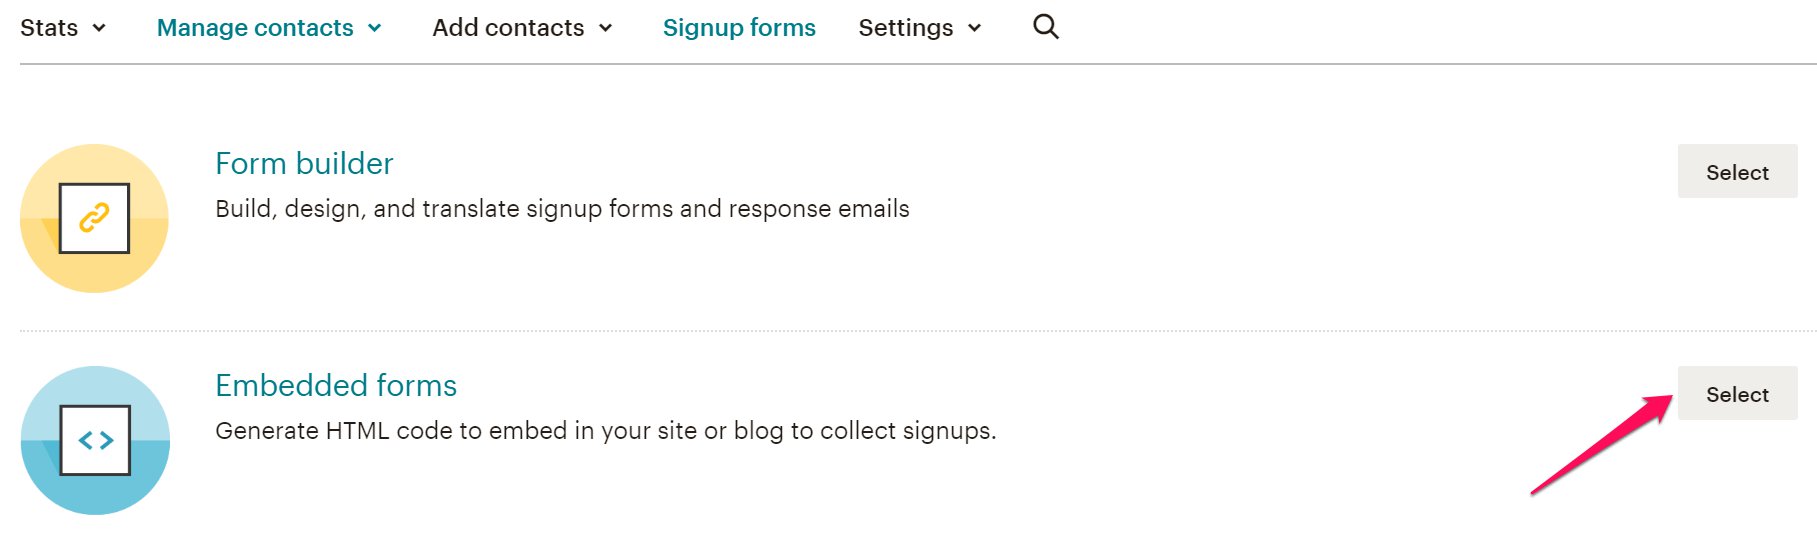
How do I add a Mailchimp signup form to my website?
(Follow these steps if you have a single opt-in freebie and you are not planning to provide multiple freebies. If you are, skip this step)
1. Click on the “Select” besides the Embedded forms.
2. Choose the style of the signup form as you want it to look like:
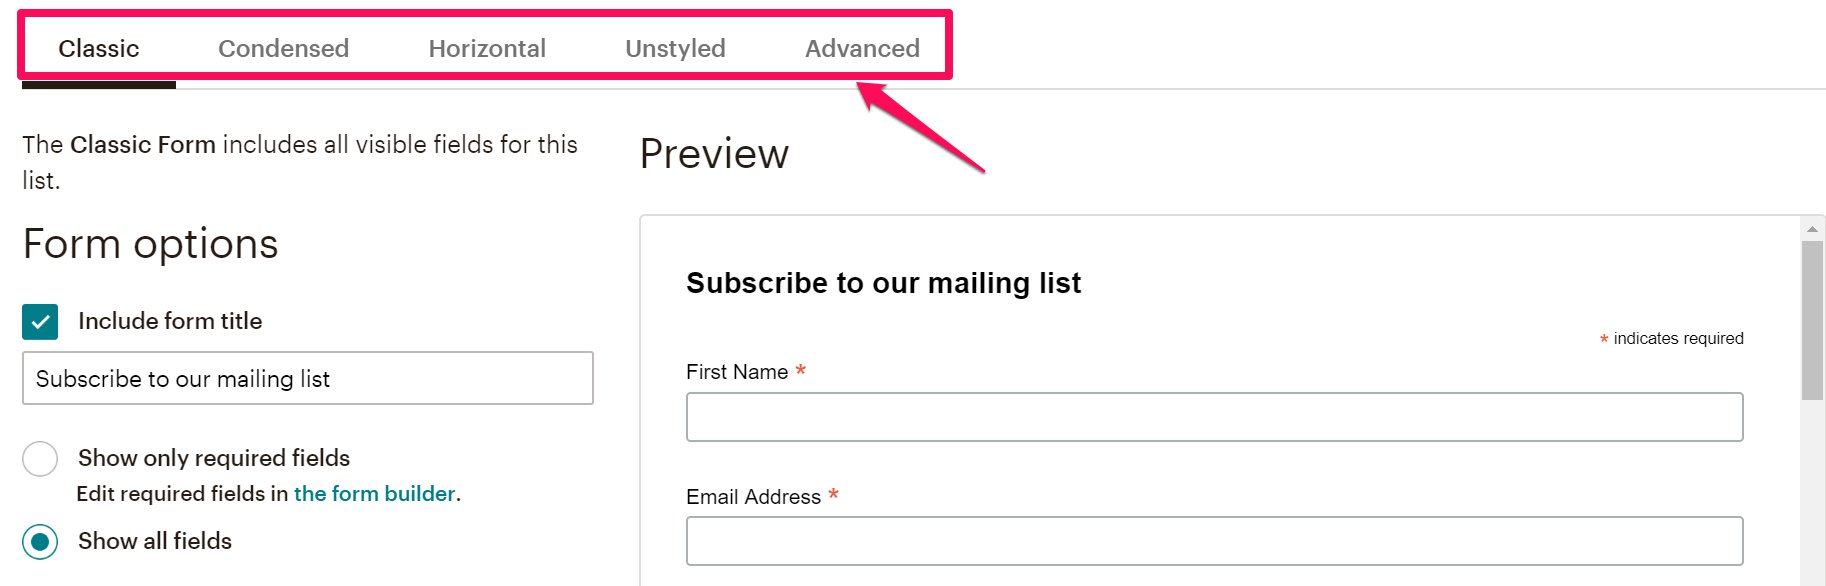
3. Change the form options as you like. I usually remove the form title and the required field indicators.
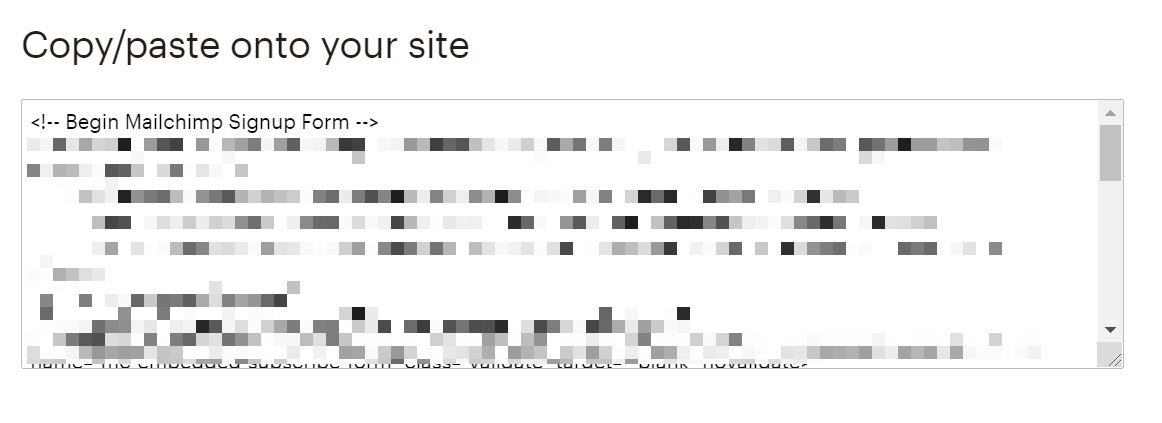
4. Once done that, grab the code and copy and paste it into your website where you want to place the signup form.
You don’t need to change anything in the code, just copy-paste as it is.
RECOMMENDED READING:
How do I tackle multiple opt-in freebies in Mailchimp?
If you have multiple opt-in freebies, you create a list, as described above.
Then, create groups for the multiple opt-ins.
Here’s how to do that:
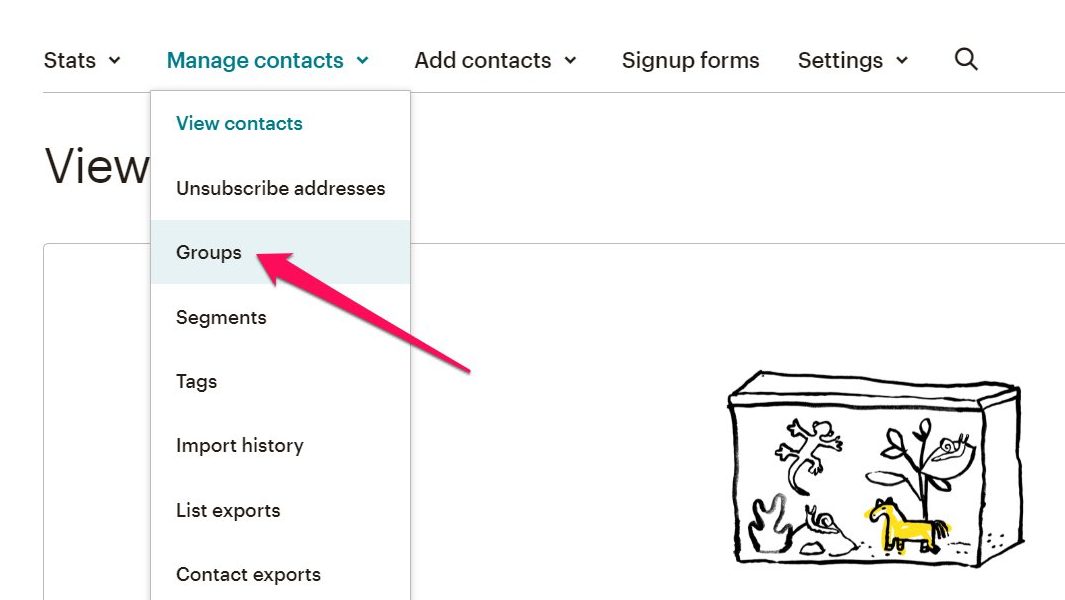
1. Go to your list and then click on Manage Contacts and then Groups:
2. Click on “Create Groups”.

3. Check “Don’t show these groups on my signup form”. Name the group category as you like (maybe “Freebies”?) and then add your different opt-in forms under group names.
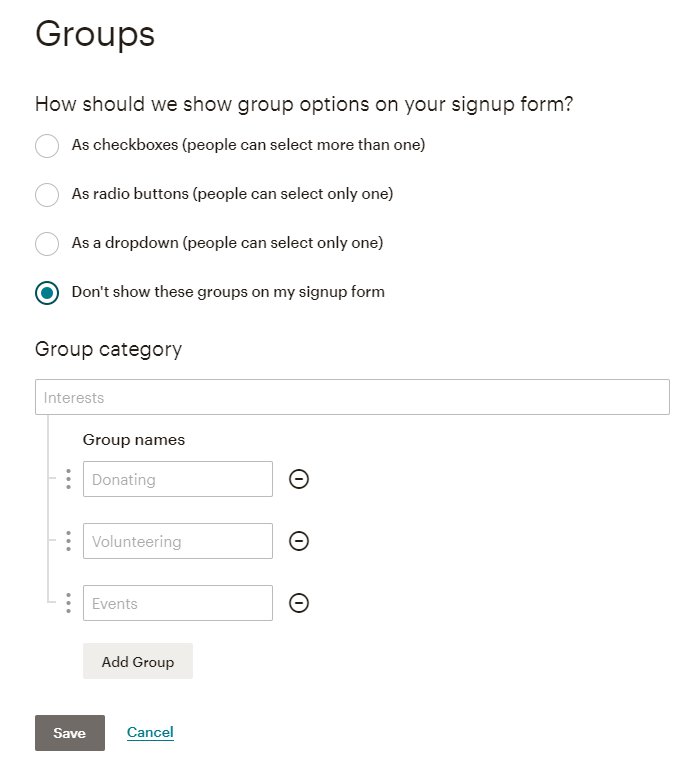
If you have more than 3 freebies, click on “Add group” to add another group.
4. Whenever you add another freebie, simply come over here and add another group (not “group category”!) for that freebie. It’s as simple as that.
RECOMMENDED READING:
Embedding Mailchimp Signup form for multiple opt-ins
You can’t embed Mailchimp’s signup form code because it won’t give you code for the hidden groups that we just created. So, we need another tool to handle this.
In fact, this tool is going to make your life much, much easier.
- You won’t have to insert code manually every time you want to show the signup form, as we did before.
- It would handle all the hassles of Mailchimp, without you having to do anything (IF you do everything as I tell you to)
- Moreover, it’s FREE and lightweight! So, it won’t even slow down your site.
How awesome is that, right?
1. Install this plugin to your website.
2. Connect your Mailchimp account to this plugin, by fetching the API key from Mailchimp.
RECOMMENDED READING:
How to get the Mailchimp API key
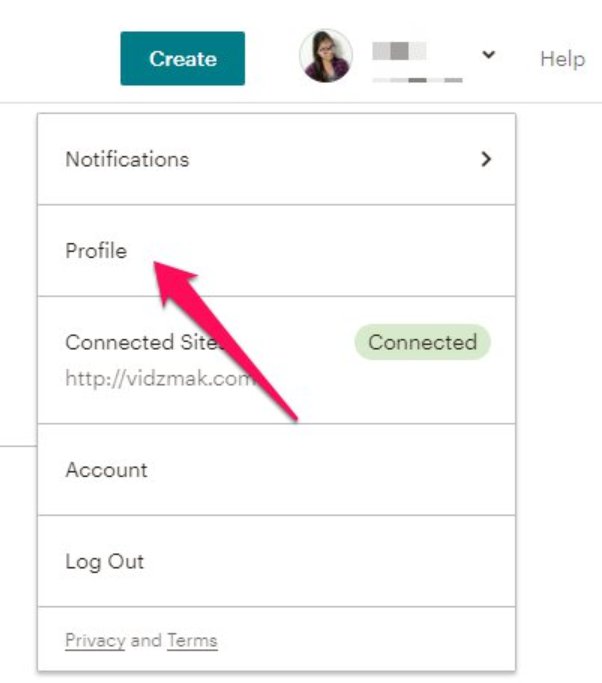
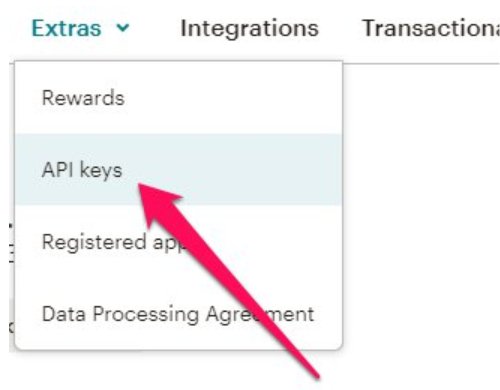
1. To get the API key, go to your Mailchimp account and click on your account’s name on the top right corner of the bar. And then click on Profile.
2. Now click on Extras and then API keys.
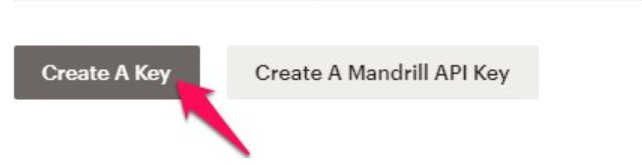
3. Click on Create A Key.
4. Under Label, change the “none set” to something that will help you remember that this API key connects you to this wordpress plugin.

5. Now, copy the API key and paste it inside the WordPress plugin you just installed.
Congrats! Now your plugin is connected to Mailchimp and it will fetch all the lists from your Mailchimp account.
RECOMMENDED READING:
Creating Signup Forms for Multiple Opt-in Freebies
If we were to use Mailchimp code instead of using this plugin, we would have to take Mailchimp’s code and tweak it EVERY TIME to let it know which group the subscriber should be added to and hence, which freebie to provide that subscriber, right?
I know playing with codes is NOT one of your best skills.
That is why, we are using this plugin.
We are going to create different signup forms in this plugin for different freebies. So that it clears out all the coding and confusions that come with Mailchimp.
1. Go to Yikes Easy Forms plugin’s “Opt-in forms” to create a new sign up form.
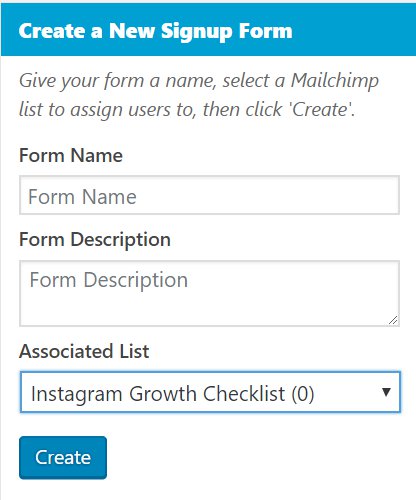
Since you have only one list, that list will show up in the Associated List as shown in the above picture. Name the form with the name of the freebie (so you remember which freebie this form belongs to), add a description if you want to, or leave it blank. Hit “Create”.
It will take you to this giant page. No need get overwhelmed- we will cover everything in major detail here, okay?
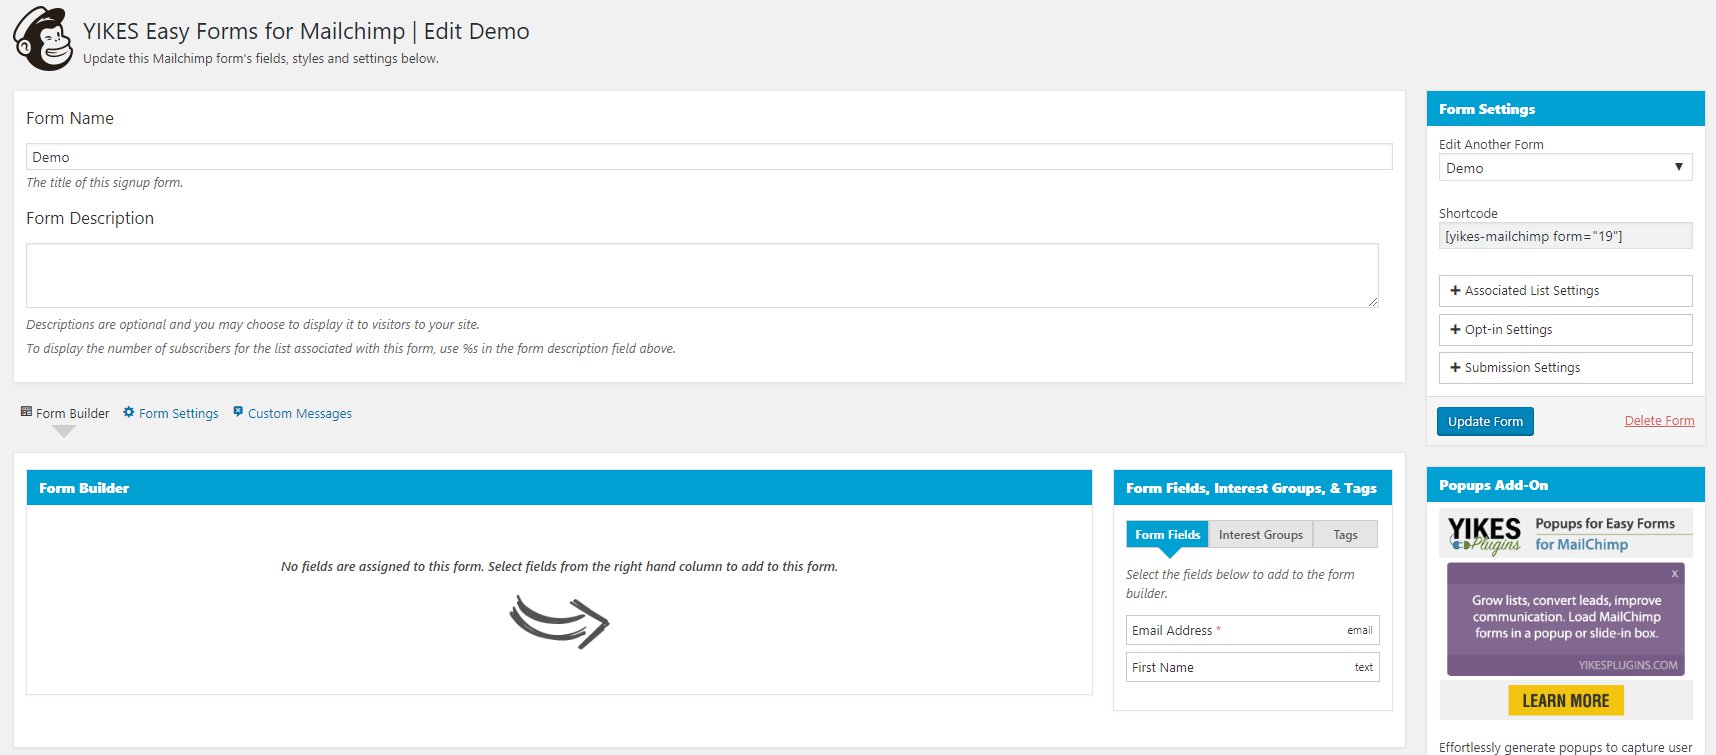
2. Look under the “Form Fields, Interest Groups & Tags” section.
Select the form fields you want to add, and then click on “Add to form builder”.

3. Once added to form builder, you can drag them to show them in the order you want them to show up in the signup form.
4. Now go under the “Interest Groups” tab and you’ll find the group that you created inside Mailchimp.
Click on that and add it to form builder the same way we added the other form fields.
Once added to the form builder, you can choose the default selection for your freebies. Meaning, you can choose which freebie this signup form will opt your subscribers into. Makes sense?
So, select the first freebie. Here’s how mine looks like.
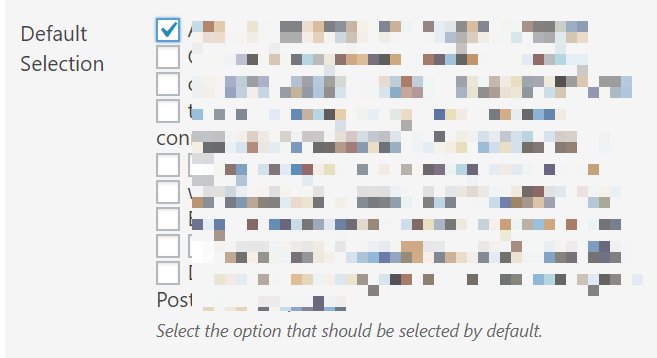
(I have too MANY freebies! LOL!)
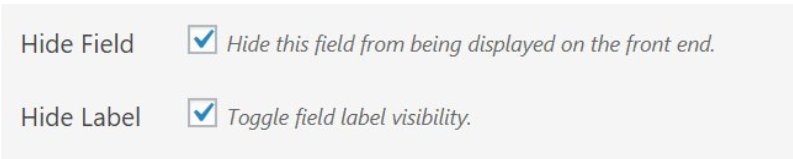
5. (IMPORTANT STEP) Now, scroll to the bottom and check these 2 boxes:
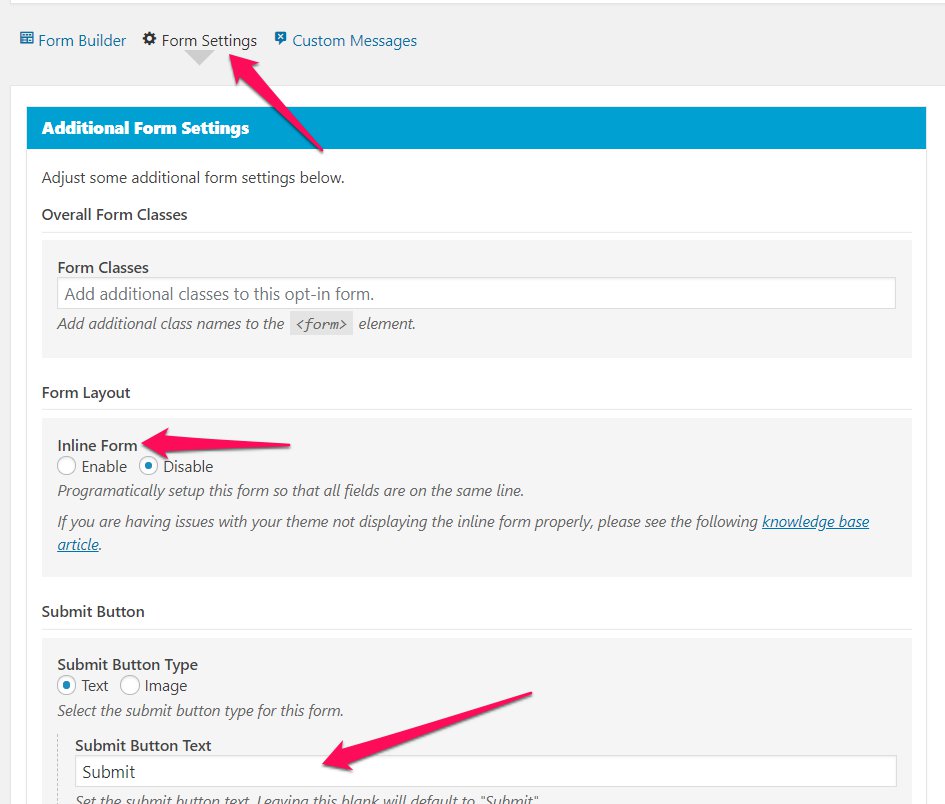
6. (Optional) Now, inside Form Settings, you can change the form layout – inline means horizontal form. So, enabling it would make your form look horizontal.
Alternatively, you can also add an attribute to the shortcode to make the form horizontal. It looks like this:
inline=1 (make it horizontal)
inline=0 (keep it vertical)
You can also change the button’s text, so it’s better if you put something actionable, like “DOWNLOAD >>>” or “GRAB IT NOW”. (Just a little tip!)
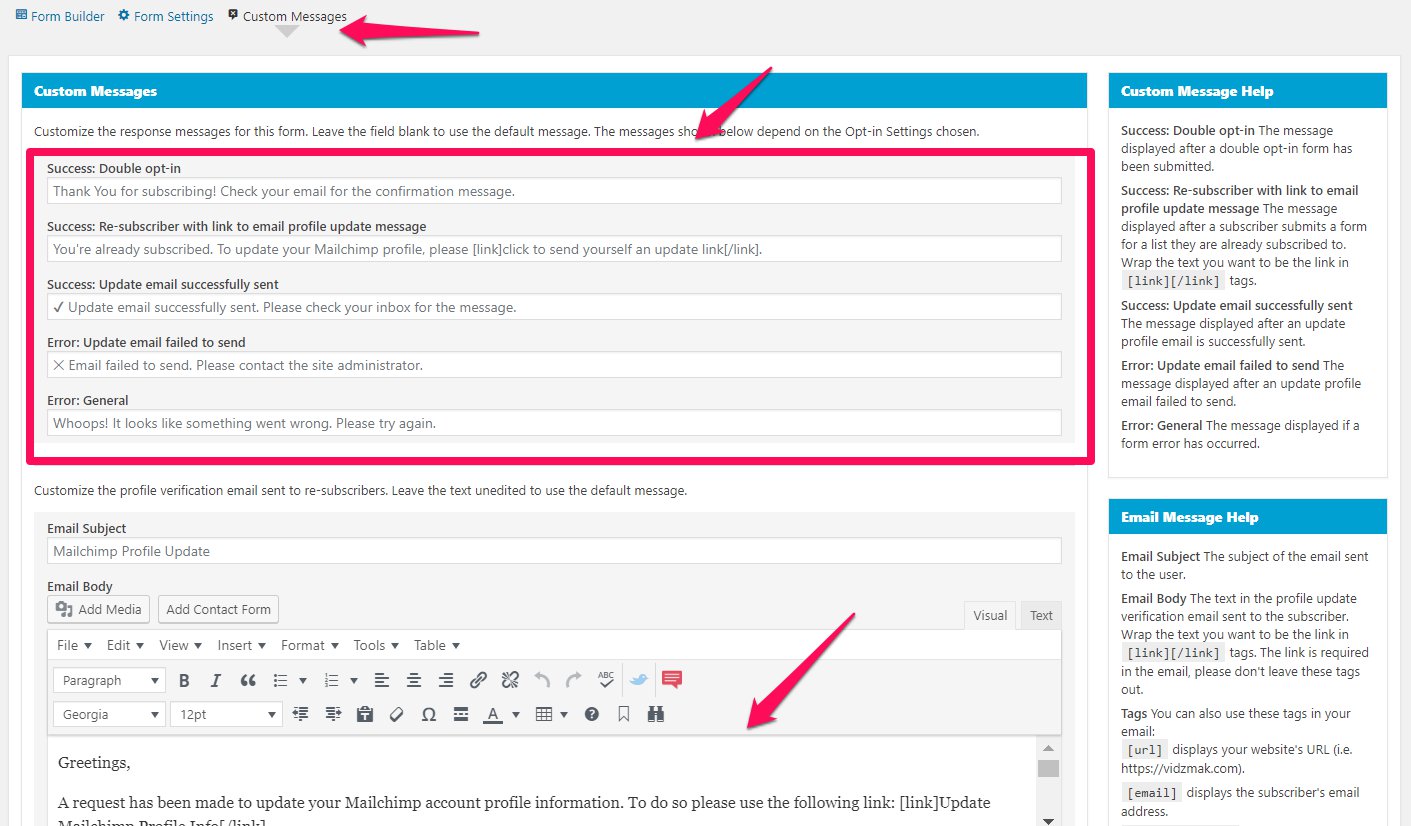
7. (Optional) Inside the Custom Messages tab, you can change the different messages that user gets when he/she interacts with your form.
You can also change the update email that the subscriber gets. (Remember, how you cannot change this in Mailchimp?)
How to tackle “Already Subscribed” problem in Mailchimp Single List Structure
A big problem:
When an already subscribed user tries to opt-in for another freebie, this signup form will throw an error:
“You are already subscribed. To update your Mailchimp profile, please click to send yourself an update link.”
See? This affects your brand image. Why would a person go through multiple steps just to access a freebie? Instead, he/she would choose NOT to get the freebie. And you don’t want that from your subscribers, especially repeated subscriber – that’s loyal, right?
So, here’s how to solve this:
1. Look at the form settings to the right of the page. And click on Opt-in Settings:
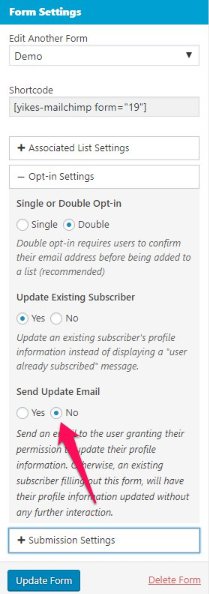
Click on “No” below the “Send Update Email”. This will instantly remove the “Update Email” mail from the custom messages section that we just went through, because now there’s no need to send the update email, right?
Your existing subscriber would now be able to access another freebie without getting an error message.
Another setting you need to do:
2. Click on the submission settings and check the “Update” inside existing interest groups:
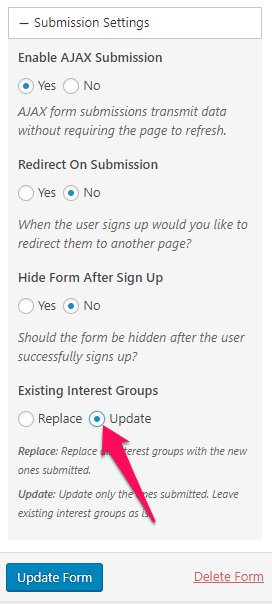
This will make sure that the user stays into all the groups that he/she has opted into so you better understand the needs and demands of your subscribers.
3. (Optional) Note that inside the submission settings, you can also hide the form after sign up – very impressive – ConvertKit provides this functionality. Now YOU have it too!
4. (Optional) You can also redirect the form to another page after submission, if you want to provide a tripwire offer.
5. Hit “Update Form” and your form is created.
RECOMMENDED READING:
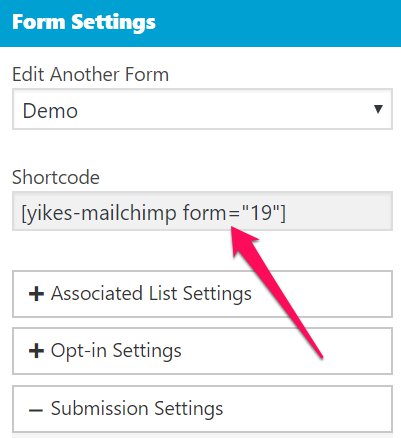
Embedding the Yikes Easy Forms for Mailchimp into your website
To insert this form into your website, all you have to do is to grab the short code from the form settings and paste it wherever you want the form to show inside your website.
That’s it! You have successfully created a signup form to collect subscribers!
Don’t like the looks of the opt-in form provided by this plugin?
Download my (completely customizable) opt-in form templates here.
Creating Another Signup Form in Yikes Plugin in 4 Simple Steps
When you want to create another form in Yikes plugin, all you have to do is to use the duplicate functionality.
1. Click on duplicate on an existing form.
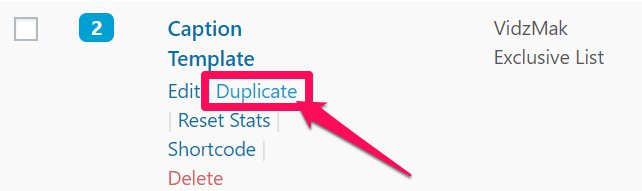
2. Go to the duplicate version.
3. It will take you to the signup form creation page as before. Here, change the name of the form to the respective freebie.
4. (Very Important Step! Don’t forget this, if you use the duplicate function. Or your subscribers will keep getting the wrong freebie!)
Change the default selection of the group for another freebie.
Look at the image below and change this selection.
5. Hit “Update Form” and voila. New signup form in 4 simple steps!
But wait, how to send freebies to these subscribers?
How do I create an automated email in Mailchimp for multiple freebies?
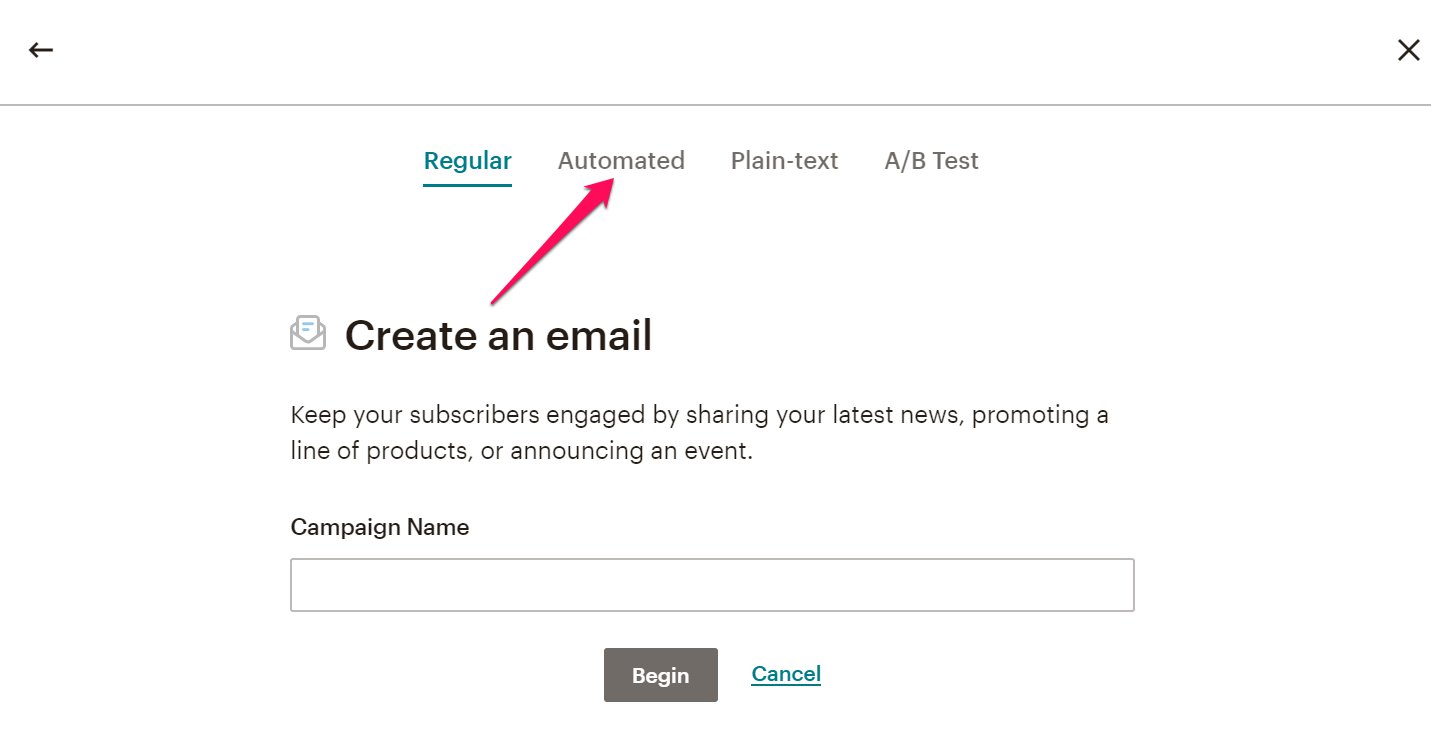
1. Go to Mailchimp, hit “Create” at the top-right side of the page.

2. Click Email on the new screen and it will take you to another page. Click on automated.
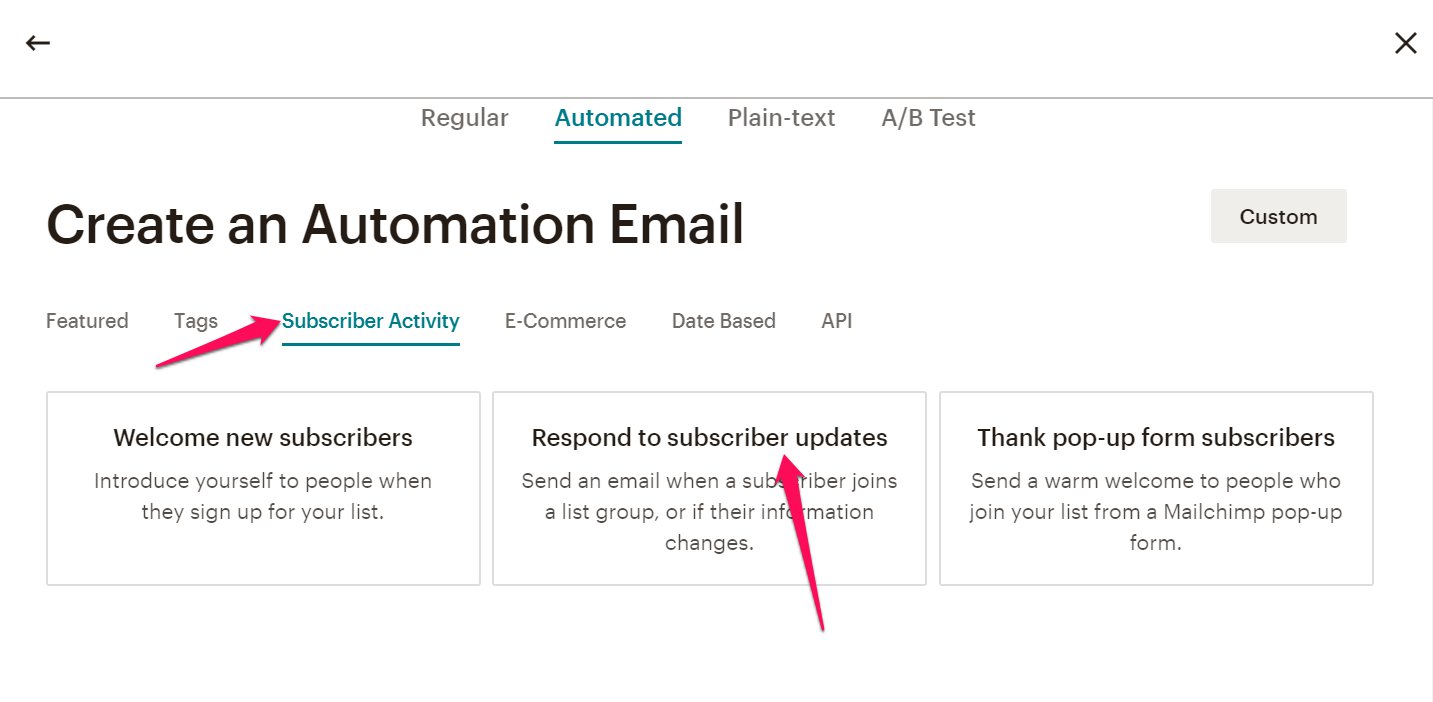
3. It will ask you for a trigger for when to send the automated email.
Most people click on welcome new subscribers and that is where they go wrong.
A welcome email will go to EVERY one, no matter which opt-in freebie they opted in for.
But you want to send different emails for different freebies. So, you need to send emails when the subscriber joins a list group. (Remember the groups we created? Those are called list groups in Mailchimp. Remember that!)
To do this, go to “Subscriber Activity” and click on “Respond to subscriber updates”.
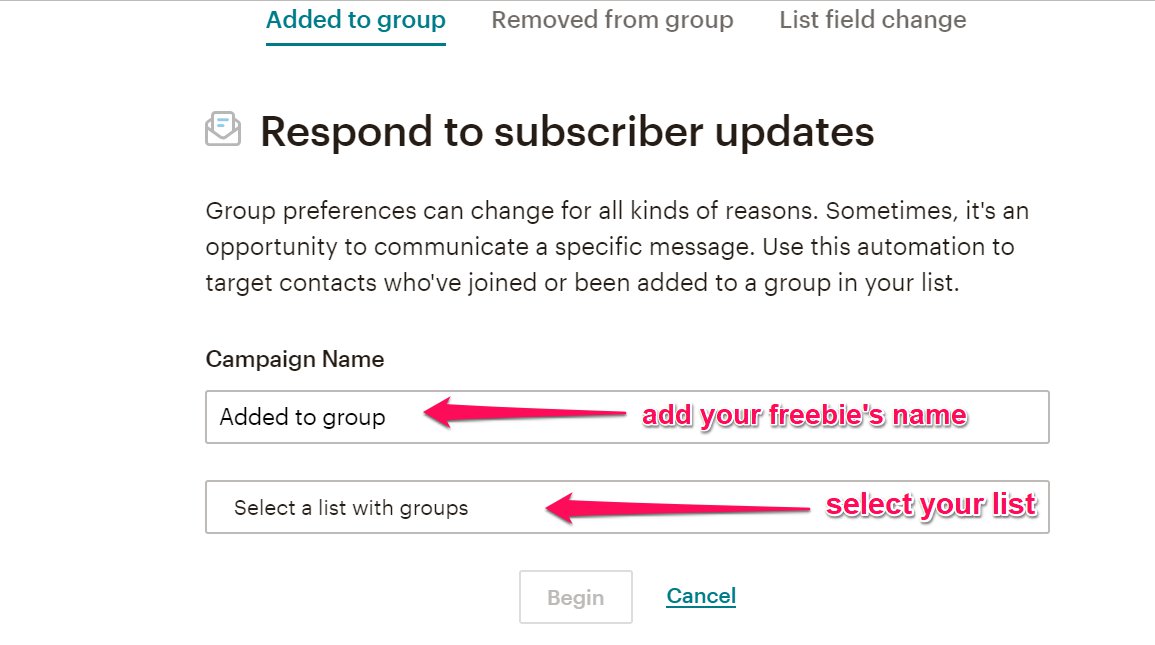
4. It will ask you to input campaign name and the list name.
Note: Make sure you name the campaign according to the freebie it refers to so you remember which email belongs to which freebie. This campaign name is not visible to your subscribers so name it as you like.
Click on Begin.
5. It will take you to a page that will have 2 emails, remove the second email by clicking on the downwards arrow beside “Design Email” -> “Delete Email”.
Type “DELETE” without quotes in the box that appears next and hit “Delete”.
6. Now you have your email, this is where you are going to write whatever you want to send to your subscriber when they opt-in for your freebie.
Now you need to tell Mailchimp that if someone joins “this” group, send this email.
To do so hit “Edit” here:

7. On the next screen, choose the freebie group and change it to go immediately after a subscriber signs up:
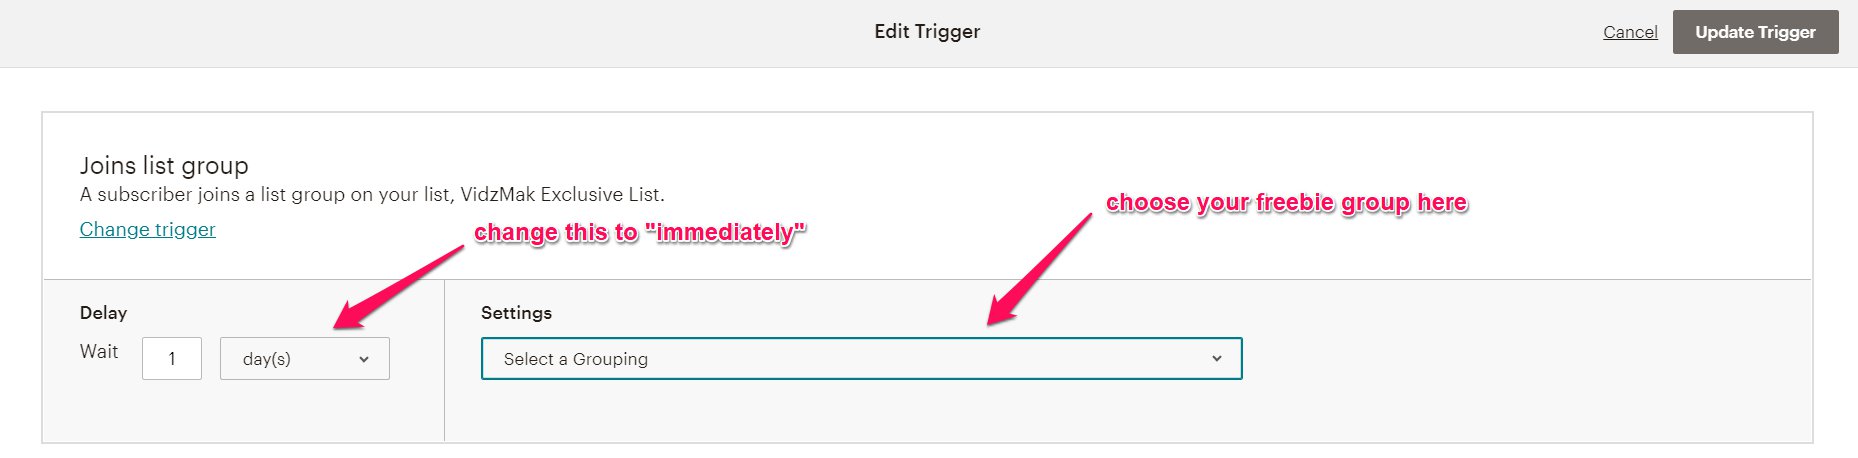
8. Hit “Update Trigger” and you’re ready to write your email.
9. On the next page, click on “Design Email” to design your email as you like.
10. Once you have wrote your email, click on “Next” at the bottom-right corner and on the next page hit “Start Sending” on the bottom-right corner.
And your automated email is ready to go out once someone subscribes to it.
Note: Try subscribing to it yourself after embedding the plugin’s short code into a page or post and test if it works correctly. Do NOT unsubscribe yourself from this list or you will never be able to subscribe again (That’s kind of a new law, I’m not sure though!). If you want to test again for the same freebie, remove yourself from the group from the Mailchimp’s dashboard and then subscribe yourself again from your website. See if you get the email again. And you should!
RECOMMENDED READING:
What if I already have multiple lists? How do I merge lists in Mailchimp?
1. If you already have multiple lists and want to merge all of them into a single list to get out of the Mailchimp’s hassles, here’s what you need to do:
First of all create a new list, or choose one list that has highest number of subscribers and add groups to the list as described here.
2. Then, merge lists in Mailchimp as described in this article (Use the export method).
3. And then, create emails for all the groups (freebies) as described here.
4. Embed the plugin’s short code at all the places where your Mailchimp code is and you are done!
That was a long article. I know that. More than it took you time to read and implement all this, it took me to create it, but I hope it answered all your questions. If not, comment below with your Mailchimp questions and I’ll try to answer all of them.
Want to make your opt-in forms look professional?
Download my (fully customizable) opt-in form templates.
Want to notch this UP even more?
Download the Advanced Email Marketing Guide:
The Advanced Email Marketing Guide
This is what you’ll learn:
- How to create a general welcome series for all the small freebies
- How to align general welcome series with an email course freebie
- How to create a regular list to which you can send your “regular” emails (without worrying about clashing with automations and sending 2 emails in a day!)
- …and more!
27 Comments
This tutorial helped me a lot. I have a question…how do I get a Mailchimp popup form to automatically update subscribers’ profiles because my popup form gives the already subscribed-error ??
Hi Vidhi,
Wow, such thorough instructions!
I’ve worked through everything, including creating my automated email. However, when I test the form with a temporary email, although I get a success message on my website, no emails come through with the dowload link.
Is it likely I’ve done something wrong setting it up? Or as I’ve seen in a previous comment, is this now only possible to do with a paid version of Mailchimp? I’m using a free version.
Thanks.
Hi Vidhi! Wonderful Article. I’m following your steps and am to the point where I paste the API key in the WordPress plugin I downloaded. I found the location where I’ve downloaded the plugin, but I”m not sure how to paste the API key – my file finder just shows the lists of files and folders downloaded. Is it because I created my website with Squarespace instead of WordPress? Perhaps your article doesn’t apply to a Squarespace website – is that the case? Thank you so much!
Abbay
Hi Vidhi,
I was wondering if you know how to create multiple opt ins via mailchimps landing page service. I don’t have a website yet to use plug ins.
Thanks x
This was just what I was looking for. I was really frustrated and struggling. Thank you SO much for this post!!!
You’re welcome Laurika! Glad it helped you!
Hello,
On my website I have an ebook people can download. In order for them to do that, they fill a form (wordpress pluggin “Easy Forms for Mailchimp”), which adds them to my Mailchimp audience, with a specific Tag.
In Mailchimp, I have an automation based on the contact receiving that Tag, sending the user an email with the link for the ebook.
My problem is if the user misplaces the ebook or the email with the ebook link. If he goes to my website, and tries do download the ebook once more, he will not receive the email, because, on the mailchimp audience, he already has that Tag, so no email is sent.
I want for the user to receive that email once more. How can I do that? What trigger will allow me to do that?
Kind regards
Nuno
Hey Nuno,
On the right hand side of the plugin inside that form, you have the capability to change the options “Send Update emails” to “No” and “Existing Interest Groups” to “Update”. I no longer use Mailchimp, but I think this should help you out. Try it out. Hope this helps.
Best,
Vidhi
Got it to work!! Thank you so much!
Awesome! Glad it helped you!
Thanks Vidhi,
That is helpful, but I believe the option in Mailchimp to ‘send automated e-mails’ is now a paid feature which is the main cause of issue.
Everything else works great!
This is such a fantastic tutorial – thank you!!
I am trying to create an automated email in Mailchimp for when someone is added to a group (signs up for a freebie), but it seems this option is now only for paid subscriptions. Is that correct? Thanks in advance!!
Yes, Ellen, that’s true.
But there’s another workaround for this!
Instead of using “groups” which is now a paid feature, you can use “tags” which is still a basic feature. So, when you tag a form (which you can do in the Yikes plugin), then you can create an email inside MailChimp for the condition “when someone is tagged with this keyword, send this email”!
As simple as that!
Hope this helped.
Best,
Vidhi
This has been an absolute life saver!! I spent over 4 hours trying to figure out multiple freebies in Mailchimp! 😭
20 minutes into this post and all my issues were fixed!!
Thank you SOOO MUCH for sharing!!
Hi Amanda,
SO GLAD this worked out for you! Thanks for taking the time to comment & share your wins here 🙂
Best,
Vidhi
Hey Vidhi:
I wanted to say thank you for your article. I’ve been trying to figure out MailChimp for weeks now; so now I’ll give it another try. I’m a new blogger by about 8 weeks and I still haven’t been able to get a freebie out there because of not understanding MC. Now it should be full steam ahead!!
There is just one thing I don’t understand or I missed in your article. How does MC know where to go to get the freebie that I want a subscriber to get?
Hi Cher,
That is the whole point of this tutorial! I think you need to read the section “how to handle multiple freebies in MailChimp”.
MailChimp does not “get” your freebie and gives it to the subscribers, it only “knows” which email to send when this form is filled! (Hope this makes sense to you!)
So, you need to make sure that “that” email contains the link to download the freebie that you want a subscriber to get when a particular form is filled.
Let me know if this still confuses you!
Best,
Vidhi
Thanks for your response Vidhi
I apologise for not being clear in my comments. I think the excitement of soaking all you have taught me in the above tutorial suddenly quashed by my inability to use the easy form as the answer to my age-long problem caused it 🙂 🙂
1. I have opt-in below each of my posts, how do I integrate easy form to the design i have presently, which is similar to your opt-in form above (want to notch this up even more)
2.
a. I have some sidebars which are designed images for some opt-ins, the expectation is that when users click on them, it takes them to a page where they can then fill in their name and email address to get subscribed.
b. SIMILAR to this is the freebie I am placing on the announcement bar, i simply want readers to click on “download or I want” button, and it takes them to a page where they can then fill in their name and email address to get subscribed.
3. Lastly, I have a full page width single line opt-in on my home page, requesting readers to subscribe, can I extend easy form to be this long and used instead of my site-wide CTA (Call To Action) widget that came with my theme
Thanks for all you do
Hello Vidhi
I have been able to figure all the questions above out, after reading your free ebook up and digesting your earlier response
Yes I am now able to link the images on my side bar to a fresh page and
by clicking enable horizontal layout, i was able to have a single line opt-in
I am now testing, but the first problem I have is that when a subscriber already downloaded a freebie, they are unable to re-download it
No mail is sent to them
How do you suggest I work round this
Thanks
Thanks a lot
This is the most detailed solution I came across in setting up my freebies
I quickly set the groups up (I think about 12) as i finalize efforts in publishing my blog
My joy was however cut short when i realized the shortcode cannot fit into my already what I am using as the sign off form – for example I cannt place it as my above the bar sign on page, my site wide CTA not even the images i created as sidebars opt-in
is there a way I get a code, like the embed form code I get from Hints and How
Please help
Hi Nik,
There’s no way to get the code, but you can always use the shortcode almost everywhere on your site. I didn’t get where you’re trying to use the shortcode.
For the images you created as sidebar opt-ins, you can use a popup. As someone clicks on the image, the popup pops up & that can definitely contain the shortcode.
If you could show me the exact thing you’re trying to do, I might be able to help better.
I also want to know how my double optin will be activated
Nik,
To activate the double opt-in inside the Yikes Easy Forms, open one of the forms & on the right-hand side, under “Form Settings” you’ll be able to see “Opt-in Settings”. Click on it & you’ll see “single or double opt-in” settings. Change it as you like.
Best,
Vidhi
Hello!! Love that you did this tutorial. I am stuck on creating a list/audience. The update version of mailchimp no longer has the create list/audience feature as shown above in your tutorial. How to create a mailing list section. There are no options to do this now currently in Mailchimp. Is there another way of doing this? Thanks
Hi Holly,
Glad that you loved the article. I noticed this as well, will update the post soon.
For now, here’s what you need to do: Go to the “Audiences” tab at the top of the menu bar. Once you’re there you’ll see under Audience “Current Audience” dropdown, if you already have “lists” or “audiences” created. (If you don’t have lists already, there must be another button right there to take you to audiences). Tap on that dropdown and at the bottom you’ll see “View audiences”. Click on that, and you’ll see a “Create audience” button on the right-hand side. Let me know if you have any other doubts. You can also reach out to me via Facebook or Instagram, if you need one-on-one chat.
Best,
Vidhi
[…] […]
[…] Read Full Article>>> […]